UFO Rescue: Week 3. Hell hath no fury like an unloved sock…

OK, this was hell week. I took these cute, cute, cute lace socks out of their storage bag and decided that I would finish them up this week. The needles in the sock are a set of my new square double-pointed ones, and I really kind of wanted them back. I had the first sock worked all the way through the heel, and it seemed like it wouldn’t take that long to get them done.

Twisted Flower UFO
Here is the UFO as I took it out of the bag. Once I had figured out where I was in the pattern I was ready to start knitting.

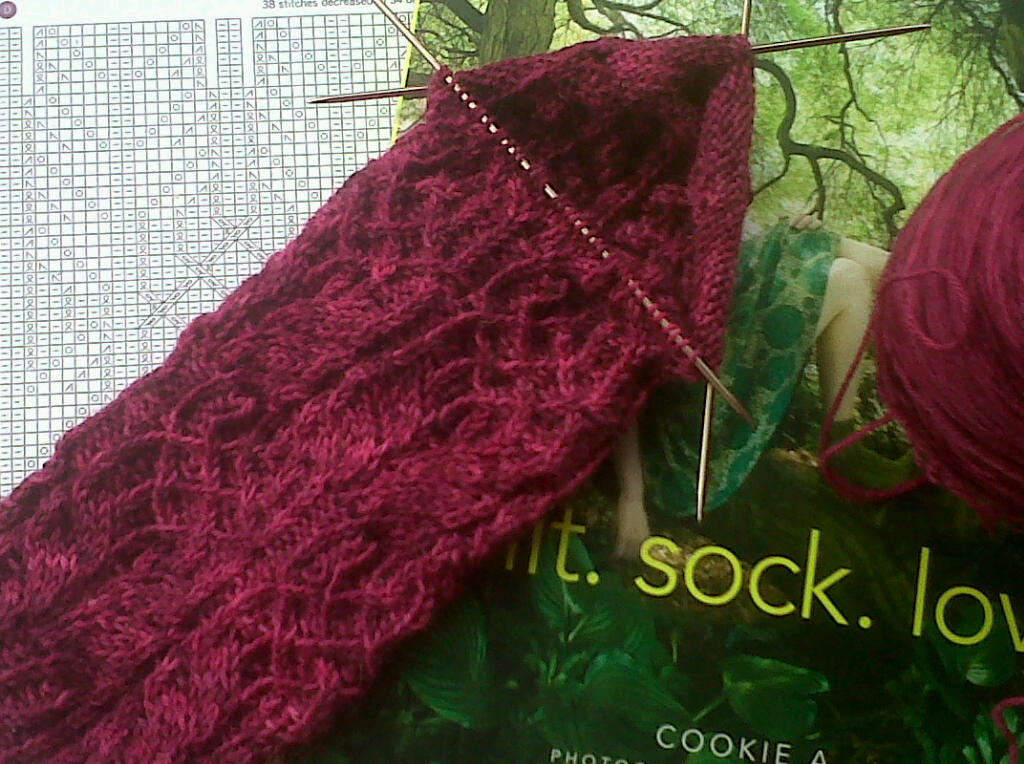
These socks are the Twisted Flower pattern in Cookie A’s book knit.sock.love. I loved the socks as soon as I saw them in the book. The pattern is really interesting, and the design is cleverly laid out to make the pattern flow onto the heel and down the foot. The chart and directions are extremely clear. Fun! I couldn’t wait to get started on these socks again.

Oh, boy. It wasn’t long before I remembered why these socks went UFO in the first place. The problem was the yarn. I had bought this hand-dyed Bluefaced Leicester yarn at a local shop as I thought that the color was really nice.  Once I got into the pattern, however, it displayed some truly unsavory yarn qualities. It was a 4-ply fingering weight yarn, and should have been round enough to show off the pattern well. Well, the yarn was round, but something ugly had occurred in the dyeing process (I think) and it had the sullen personality of garden twine.  There was absolutely no bounce in this yarn at all! It was stiff and slippery; at every opportunity a stitch slipped off a needle and unraveled down three rows in the blink of an eye. The individual  plies of the yarn kept springing apart from one another and I kept splitting the yarn with my needle.

This sock pattern has tons of personality and detail.

Then there was the beautiful pattern designed by Cookie A.  This pattern involves lace on every knitted row, cables, twisted stitches and a partridge in a pear tree. You need to read the chart forwards and backwards while manipulating the (slippery) little stitches. There was no way I could watch television while knitting; every bit of my attention needed to be focused on the chart and the sock. Normally this isn’t an issue as this type of knitting has a zen-Iike meditative quality, but things weren’t working out for me with the demon yarn. I had to use five double-pointed needles and a cable needle while working;  I tried four different cable needles trying to find one that wouldn’t slip out. Yeah, right. The cable needle that I needed doesn’t exist.   I began to pull on my hair and refer to socks as THE HELL SOCKS.  More than once they came very close to entering orbit and becoming true UFOs!

Knitted Sock
Too cool for shoes. These babies will be my reading buddies next winter.

Beautiful socks. Wrong yarn. I’m thinking now that I should have washed this yarn before using it to help it recover some of its life before I started knitting.  Oh well, lesson learned.

Tomorrow I am washing these socks to see what will happen. They are beautiful, but I am never putting these babies into shoes. They will grace my feet with their beautiful lace on cold nights while I am reading and remind me that art never shows how long it took, only how good a job you did.


Darwinian Mitts


knitted mitts
Soft squishy mitts that have a good fit, sport a stylish cable and can be machine washed. What more can you want?!

Materials

  • Approximately 100 yards of worsted weight yarn. The mitts look great in handpainted yarns that are smooth or a rustic one-ply. My favorite yarns are Malabrigo Rios, Madelinetosh Tosh Merino, or Dream in Color Calm.
  • Size 6 (4.0 mm) double pointed needles.
  • 2 stitch markers
  • 1 cable needle
  • Waste yarn
  • Yarn needle

Size
These mitts fit my small/medium sized hands well.

Gauge
This kind of depends on the yarn you use and how elastic the ribbing is.  Slightly stretched ribbing, 8 stitches = 2”

Abbreviations

  • CO: cast on
  • K: knit
  • C6B: slip three stitches onto a cable needle and hold to the back of the work. K3, K the three stitches from the cable needle.
  • C6F: slip three stitches onto a cable needle and hold to the front of the work. K3, K the three stitches from the cable needle.
  • PM: place marker
  • M1L: put strand between two stitches over left needle from front to back. Knit into back of the loop.
  • M1R: put strand between two stitches over left needle from back to front. Knit into the front of the loop.
  • SM: slip marker
  • BO: bind off

Thumb Gusset

  1. Round 1: PM, K1, M1R, K1, PM.
  2. Rounds 2-3: SM, K the stitches between the markers, SM.
  3. Round 4: SM, K1, M1R, K1, M1L, K1, SM. (There are now 5 stitches between the markers.)
  4. Rounds 5-6: SM, K the stitches between the markers, SM.
  5. Round 7: SM, K1, M1R, K3, M1L, K1, SM. (There are now 7 stitches between the markers.)
  6. Rounds 8-9: SM, K the stitches between the markers, SM.
  7. Round 10: SM, K1, M1R, K5, M1L, K1, SM. (There are now 9 stitches between the markers.)
  8. Rounds 11-12: SM, K the stitches between the markers, SM.
  9. Round 13: SM, K1, M1R, K7, M1L, K1, SM. (There are now 11 stitches between the markers.)
  10. Rounds 14-15: SM, K the stitches between the markers, SM.
  11. Next round: Place the 11 thumb stitches onto a piece of waste yarn using a needle while removing the markers. CO 2 stitches using backward loop method. K these two stitches in the following rounds of knitting.

Left Mitt

  1. Cast on 36 stitches. Divide the stitches evenly between the three needles (12-12-12) Join to knit in the round carefully, making sure to not twist the stitches.
  2. Rounds 1-4: Work in K2, P2 ribbing on all three needles.
  3. Round 5 – 8 : Begin cable pattern on 1st needle: K2, P2, K6, P2. Continue in K2, P2 ribbing on other 2 needles. Repeat for three more rounds.
  4. Round 9: Cable pattern on 1st needle: K2, P2, C6B, P2. Continue in K2, P2 ribbing on the other 2 needles. (Twist 1)
  5. Following 9 rounds: Needle 1: K2, P2, K6, P2. Continue in K2, P2 ribbing on other 2 needles. (The cable twists every 10th row of knitting.)
  6. Next round: K2, P2, C6B, P2 on 1st needle. Continue K2, P2 ribbing on 2nd needle. (K2, P2) twice, insert thumb gusset, P2 on 3rd needle. (Twist 2)
  7. Following 9 rounds: K2, P2, K6, P2. Continue in K2, P2 ribbing on other 2 needles working the thumb gusset at the same time on the 3rd needle.
  8. Next round: K2, P2, C6B, P2 on 1st needle. Continue K2, P2 ribbing on other needles while working the thumb gusset on 3rd needle. (Twist 3)
  9. Following 9 rows: K2, P2, K6, P2 on 1st needle. Continue K2, P2 ribbing on other needles while working the thumb gusset on 3rd needle. When the gusset is completed work K2 on the CO stitches to reestablish K2, P2 ribbing on this needle.
  10. Next round: K2, P2, C6B, P2 on 1st needle. Continue in K2, P2 ribbing on the other 2 needles. (Twist 4)
  11. Next 4 rounds: K2, P2, K6, P2. Continue in K2, P2 ribbing on other 2 needles.
  12. Next 3 rounds: K2, P2 ribbing on all three needles.
  13. Last round: CO loosely in pattern. As you cast off you create the 4th round of ribbing at the top of the mitt.

Right Mitt

Work exactly like the left mitt with these changes: 1. Replace each C6B with a C6F. This reverses the twist of the cable; it should be twisting towards the thumb. 2.  Work the thumb gusset on the 2nd needle in this way: K2, P2, insert thumb gusset, P2, K2, P2. The 3rd needle will be ribbing on this mitt.

 Finish Thumb

  1. Place the 11 stitches on the waste yarn back onto the needles and rejoin the yarn.
  2. Pick up and knit 4 stitches across the body of the mitt: 1 stitch before the 2 CO stitches, 2 in the CO stitches, and 1 after the CO stitches.
  3. Knit 5 rounds even.
  4. BO loosely.

You’re Done!
Each mitt has 4 ends that you will have to weave in. Do it!
What is blocking? Put on your mitts and go show them off!