It has been a really good week knitting-wise. The weather is cooling down at last, I’m caught up on most of my major projects, and the new season is starting up on television. I find myself knitting outside in the garden, at the doctor’s office and even during the football games (Go Broncos!!) The leaves are turning at last and I am churning out my Drachenfels shawl.
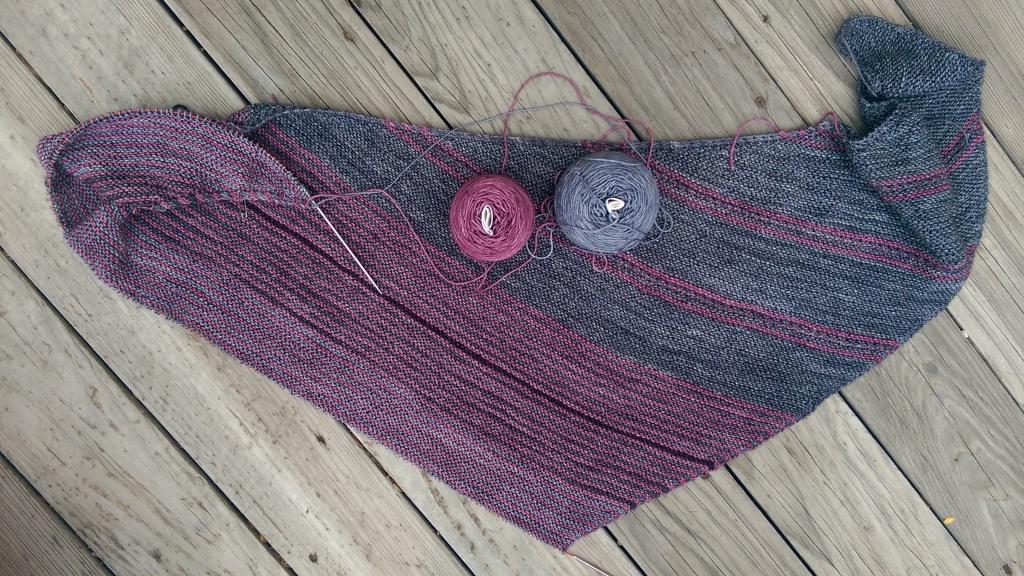
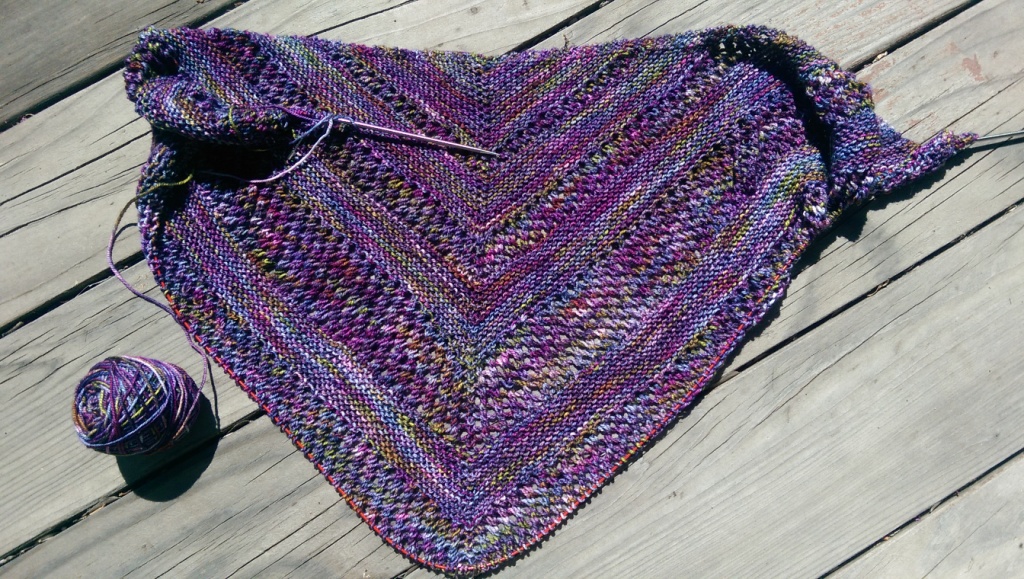
I’ve made the transition from the charcoal grey to the slate gray yarn. It’s subtle but should look better when I get to the solid slate portion of the shawl. I put in one black garter ridge at the midpoint of the charcoal/plum section of the shawl. Later on I will use the black to do the I-cord bind-off. Here are the project notes on Ravelry.Of course as soon as I put the shawl down for the picture MacKenzie moved in. One of my favorite shows to watch while knitting is the A&E production of Pride and Prejudice by Jane Austen. You know that quote from the book/film: “It is a truth universally acknowledged, that a single man in possession of a good fortune, must be in want of a wife.” MacKenzie believes that it is a truth universally acknowledged, that an unattended knitted object must be in want of a cat.and loose yarn is made for chomping. He especially likes this cashmere blend Smooshy by Anzula Yarns. He and I have had several conversations about this over the last week…
At this point I removed him from the picture shoot.
Here’s the cat hair embellished closeup of the black yarn ridge and the transition from charcoal to slate grays. What do you think?
You can’t see it in the pictures, but this yarn is knitting up really soft and should have a great drape when done. I am using a smaller yarn than the pattern was designed for (fingering instead of sport) and moved down to size 4 needles (3.5mm) instead of size 6 (4 mm), but this shawl is coming out plenty big!
The forecast is for cooler weather and rain showers this weekend, and there is a Broncos game Sunday. I plan to really crank out some knitting over the next couple of days. The shawl should be big enough both for me and the cat soon. 🙂
Yesterday was a quiet day for me; I was recovering from the long days in the heat at the alpaca ranch last weekend and had entered basic slug mode. What could be better than to take some finishing tasks out to the garden swing to finish off. 🙂
Why do I keep doing this? I have 5 pairs of mitts all ready to go except… the thumbs need to be finished. Ugh. Basic boring knitting. Here’s the project page for these mitts at Ravelry that also has the pattern written out in the project notes.
Luckily it was a nice day. All my flowers in pots continue to bloom like champions. Both cats moved out to hang with me. I started the sprinkler on the lawn which always draws birds. There was a lot of wildlife that stopped by to entertain me. OK, since I was bored I snapped some shots. Here they are!
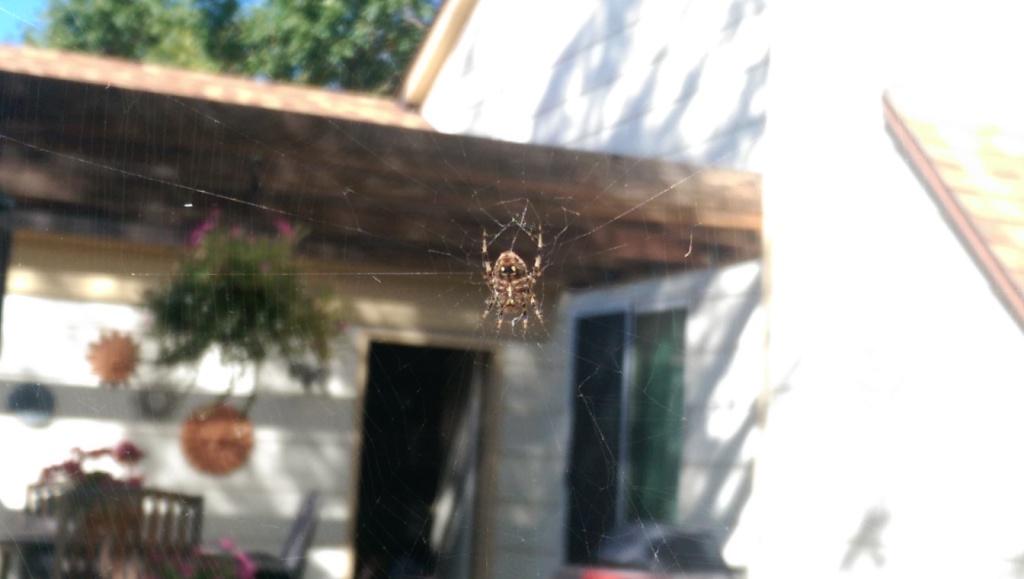
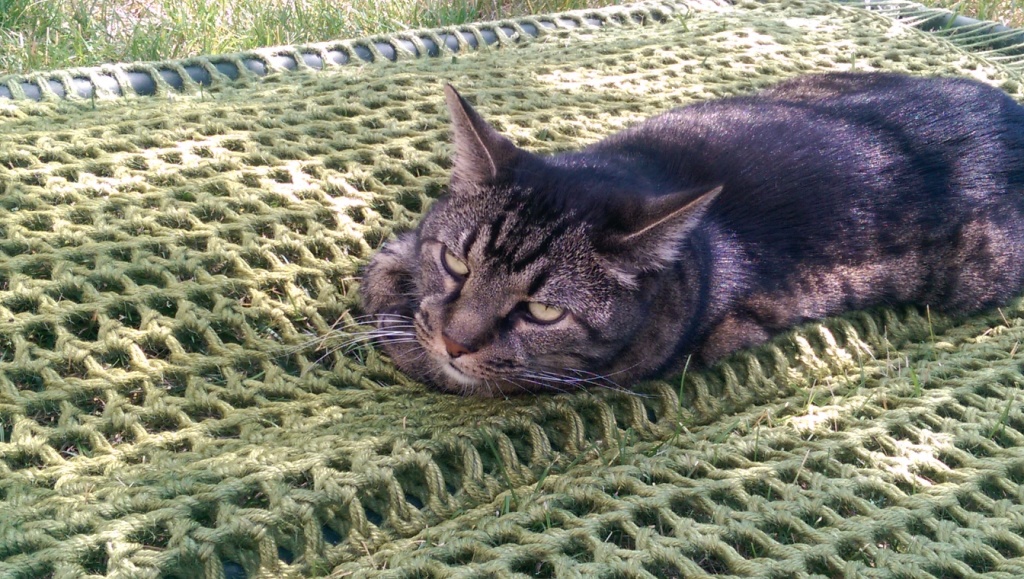
This orb weaver spider had set up shop between two of my trees! I really like these spiders with their huge elaborate webs and insect catching habits. I had one on the deck last year that spun her web every evening and then took it down in the morning. OK, I’m a geek, but I was a biology teacher so what did you expect?I ate some pumpkin spice mini-muffins with my latte while I was knitting. This squirrel started barking at me from a branch above the garden swing. I guess he felt that he was entitled to the muffins too!Yellow Boy was snoozing in the garden swing with me. When the squirrel came down the tree trunk he finally chased it off. Sometimes he can be brave.I haven’t seen many of these lately but as the morning warmed up more a Swallowtail stopped by the lantana. I love these guys. Luckily Yellow Boy was busy with the squirrel and left this one alone.
By noon is was getting too hot to stay outside. My mitts were done and the wildlife was disappearing. The cats and I headed inside.
Woohoo! Time to knit the Drachenfels shawl. I’m making progress on it and hope to show it off at the end of the week.
A few months ago I ran into someone I knew from my last job, Cari Corley, while cruising the booths at the Interweave Yarn Fest. What a shock; she had an alpaca ranch!! She practically had me at hello; a few minutes into the conversation I had volunteered a set of drop spindles and offered to help at her summer camp for special needs kids. The summer camp was great. One thing has led to another over the last few months. I began to design and knit mitts for them and we have plans for many other patterns and projects. Cari had me put the dates for Alpaca Farm Days into my calendar and I began to realize that this was an event.
Last week Cari and I worked late into the night while we edited the patterns for our mitts via e-mail. MacKenzie was extremely helpful during this editing process…
Last weekend was Alpaca Farm Days. Oh, my goodness!! Who knew that events such as this existed?
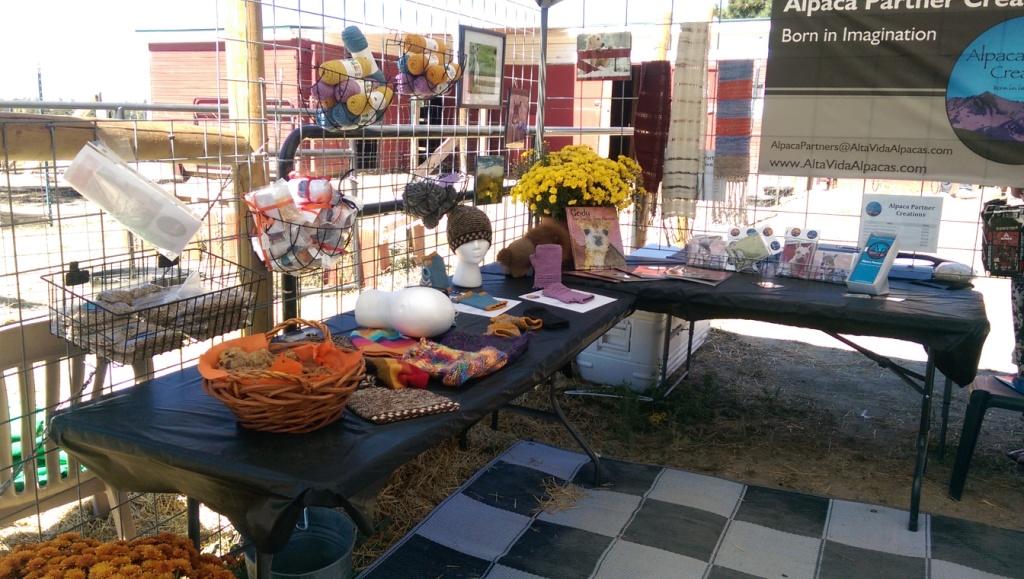
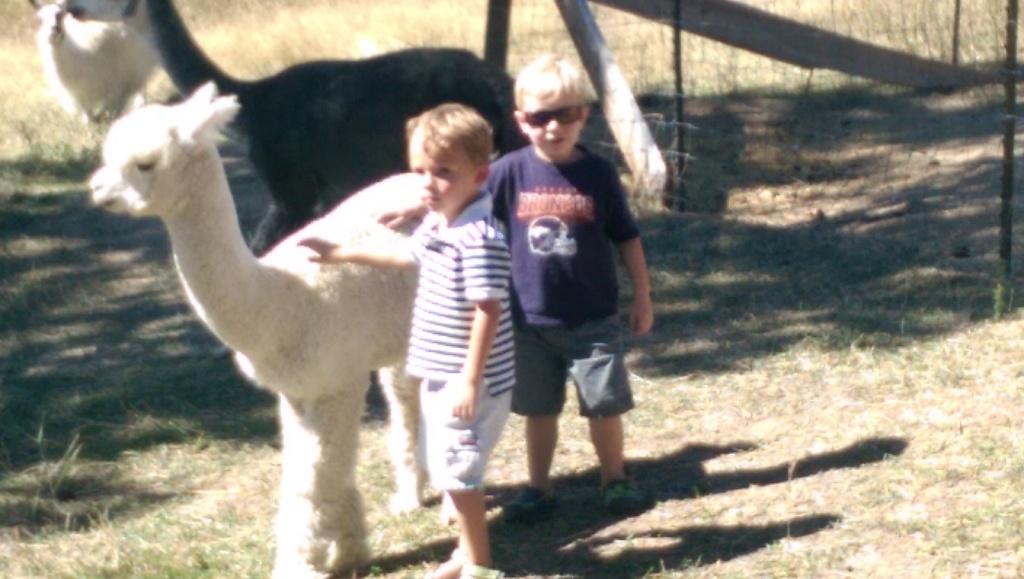
This really was farm days!! The Corleys had a sign out on the highway inviting people to visit the ranch. There was a steady stream of cars onto the property bringing loads of friends and strangers who wanted to see the animals. This pen contains “the boys”, the young male alpacas who aren’t yet ready to mix things up with the stud males. The black and white llama is their guard animal.There was a sweet little shelter and farm store that offered information about alpacas, bags of alpaca food, and alpaca-related products for sale such as yarn, scarfs and hats. There were little kits with yarn and beads made up with the patterns that Cari and I had created along with knitted samples. There was also home-baked cookies and free water for all.The pasture containing the alpaca moms and crias was open for everyone to enter. For all the kids it was a dream come true!The kids all bought little bags of alpaca food…which was greatly appreciated by the animals! There is a sheep pushing in for her share too in this picture. Why did I not get taken to event like this while I was a child. This is way better then a petting zoo!
The two days were extremely busy. While the kids fed and petted the alpaca the adults asked questions about alpacas. Many were interested in how to acquire their own stock. Others wanted to find out about alpaca yarn, fleece and finished products such as the woven scarfs and the knitted mitts. I sold my first mitt and pattern, and gave my name to the knitter in case she needs help. The little stuffed toy alpacas were all sold out and many people took away wicker balls full of alpaca fiber for birds to use as nesting material in their yards.
Everyone learned more about the ranch and Alpaca Partners. It was extremely successful (but tiring!). At the end of the day Sunday Cari began to talk about organizing Saturday morning craft days and holding another farm day event in a couple of months when the weather get colder and we begin to near the holidays. That is the best part about Alta Vida Alpacas; not only are they raising alpacas as a business, there is a serious commitment to serving and interacting with the community.
Oh, boy! I took home a case of fabulous yarn to start knitting more mitts.
I was surprised to wake up a couple of days ago to find that Sharon of Creativity and Family had received the Liebster Blog Award and had nominated me to receive it also. For those of you who don’t already know what this award is, it is one that is designed to recognize and draw attention to smaller bloggers (in terms of the number of followers) who produce sites that you (the nominator) find helpful/entertaining/meaningful and would like to share with others. At the end of this post I will pass the baton to some of the sites that I follow and really enjoy. Sharon, thank you so much for nominating me. I’m really flattered that you thought of me.
As part of accepting the award I am asked to answer some questions that Sharon sent to her nominees in her original post. I get to pick 5 or more of her questions. So, with no further ado, here are her questions that I have selected and my answers.
What is your favorite crafting tool?
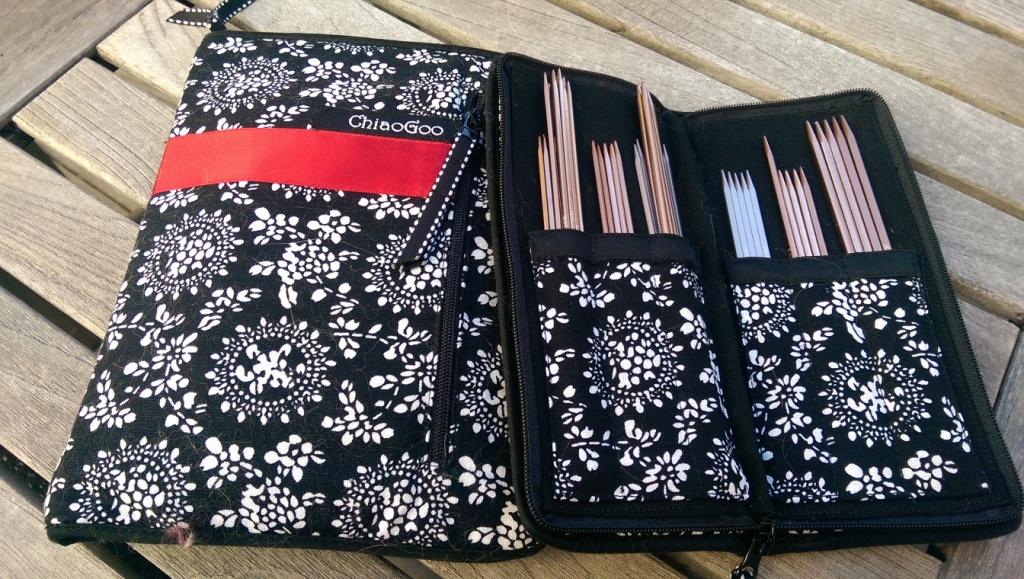
My knitting needles!! I have gone through a lot of needles in my time, but my absolute favorites are now Chiaogoo lace tip needles. I have a set of interchangable needles that I bought extra tips and cables for, several sets of cable needles, and and a set of double-pointed needles to match them. If I am just knitting a sock or mitt I use my Kollage Yarns square double-point needles. I love them so much I bought a set (or two) in every size I commonly use. I have zip-up Chiaogoo cases for them that I treasure.
It really is the little things that count. I love these needles!! The cables of the ChiaoGoo are wonderfully flexable and the square needles are so easy on my hands I can knit for hours without my hands tiring.
2. What is your favorite craft book
That’s a hard call. I went to the book shelf and hunted for the book that was the most worn and tattered. Here it it.
This book is my go-to source for patterns when I need to make a hat, or mitten/glove. It is especially nice as it helps me use my handspun yarn.
3. Do you have a project that you have made time and time again?
I have made the same sock pattern so many times that I have it memorized! It is the Chouwa sock from the book Knitted Socks East and West by Judy Sumner. No matter who I make this sock for, it fits!! I tried to make my sister something else last year and she just demanded another Chouwa. So there. If it isn’t broke, don’t fix it. 🙂
4. What is your favourite handmade gift that you have received from somebody else?
My cousin Cathy sent me a handmade quilt that I just treasure and use everytime I stay over at my son’s house. Next time I get hospitalized (knock wood) I’m going to have it brought to me because it makes me feel so happy!
5. Where do you sit to do your creating? If possible could you share a photo?
This is the knitting chair! It is so big I can sit cross legged in the chair and during the winter I snuggle under a blanket while I work. Notice the nice big (cat-suitable) arms; the cats still insist on sitting on me (chomping yarn) or on the leg rest while I knit.This is the sewing table and off to the right is the cutting board. Cats sit all over all of this too.
6. Have your creative hobbies changed over the years or do you stick to the same ones?
Knitting has been a constant for me ever since I learned around 8 years old. I’ve added in spinning, weaving, quilting, card-making and some bead work over the years, but the vast majority of my time is spent knitting. My spinning wheel resents this…
7. What do you store your wips and take out projects in?
I live it fear of wool moths. Every time I attend a workshop lately I am warned that there are, indeed, wool moths in Colorado. I have a lot of fiber coming through my house…
and I wage a constant war to keep the animal fur in the house under control.I now store all my projects in these plastic snap top storage boxes. There is enough room in there to include scissors, patterns, extra needles, etc.It’s really easy to stack and store them too!
That is it for my questions. It is now my great pleasure to nominate some of the blogs that I follow and enjoy. Please don’t feel obligated to accept the award, but if you do, there are some requirements that I have listed below. I hope that you will because I like your blog and I think that other people will to.
Acknowledge and accept the Liebster Award by leaving a comment on the blog where you were nominated.
Copy and paste the Liebster Award medal (logo) onto your own blog.
Link back to the blogger who awarded you and give thanks.
Answer the questions put to you by the person who nominated you. This is a great way to get to know the people behind the blogs. The number of questions have vary from 5 to 11 depending on who is asking.
On your blog nominate and link to your 5 favourite blogs(or more) that you enjoy but have a small readership (the rules have varied from less than 200 to less than 3000 readers). It could be that they have only been blogging for a short time or have a niche interest but are worthy of gaining more attention in the wider blogging world. That means the blogs of large, commercial enterprises are not eligible for nomination; nor are blogs that are well publicised in a variety of media and established with tens of thousands of followers.
List your questions for your Liebster Award nominees on your blog.
Inform your nominees by leaving a comment on their blogs.
Some of the blogs that I nominated are written by people with serious crafting addictions (and not enough time to get to all of them…), others are blogging about their lives with serious medical conditions, and some blogs are by people with both of these things going on in their lives. 🙂 I tried to make questions that will fit the bill for people in either group; pick 5 or more of the questions that appeal to you.
Why did you start blogging?
Why did you chose the name of your blog?
What are three of your very favorite books?
What are the biggest challenges in your day-to-day life and how do you deal with them?
What does your work (crafting) area look like? Pictures, please!!
Are you hoping to make gifts for Christmas this year? Share!! (Please do this one. I need ideas…)
What is your favorite (handmade) gift that you have received from somebody else?
Where do you get your best ideas?
Where do your creative energies go? What craft or activity is the most important to you?
Have your creative hobbies changed over the years or do you stick to the same ones?
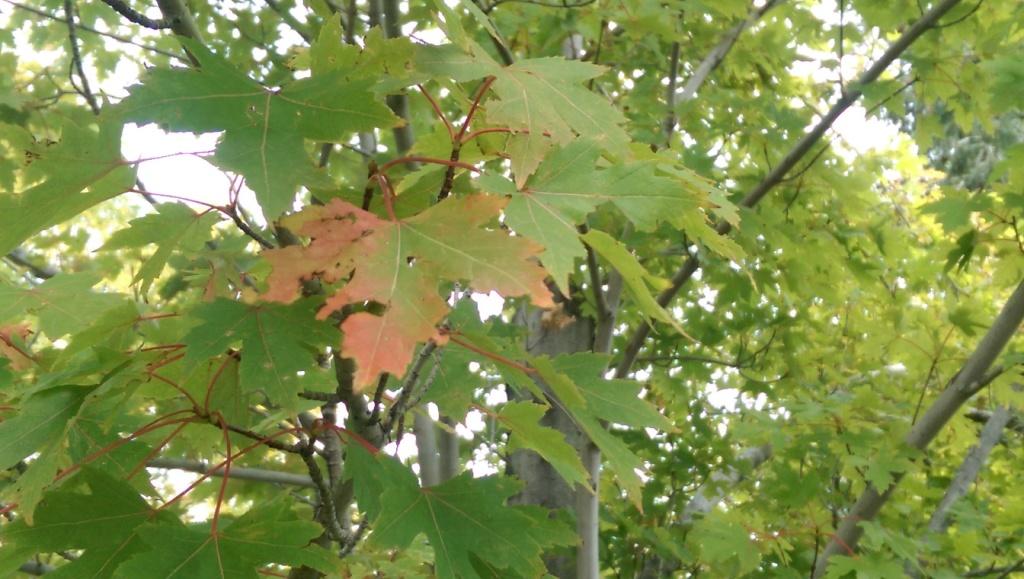
Yesterday was the last day of summer. Wow, how did that happen? I woke up, headed out to the garden to drink my latte, and there is was. The first changed leaf on the maple tree. It’s so hot outside I can hardly believe it, but the cooler weather of fall is on the way. Really, eventually it will get here.
There it is! Fall’s first leaf.
Time to think about warmer clothes and shawls. Alexand has been driving me nuts with her posts about her Drachenfels (by Melanie Berg) knitting journey. It is just beautiful. Check out her post about knitting on the go here. There is just no way around it… I am suffering from Drachenfels envy in the worst way. Fall is here. I have finished all my other knitting projects. No more excuses. Time to get started on my own Drachenfels effort.
One of the best things about Ravelry is that you can poke around and check out the projects other knitters have made of any particular pattern. I found a project (by fineknits, one of the test knitters), that was done in three colors and a highlight color. Perfect!
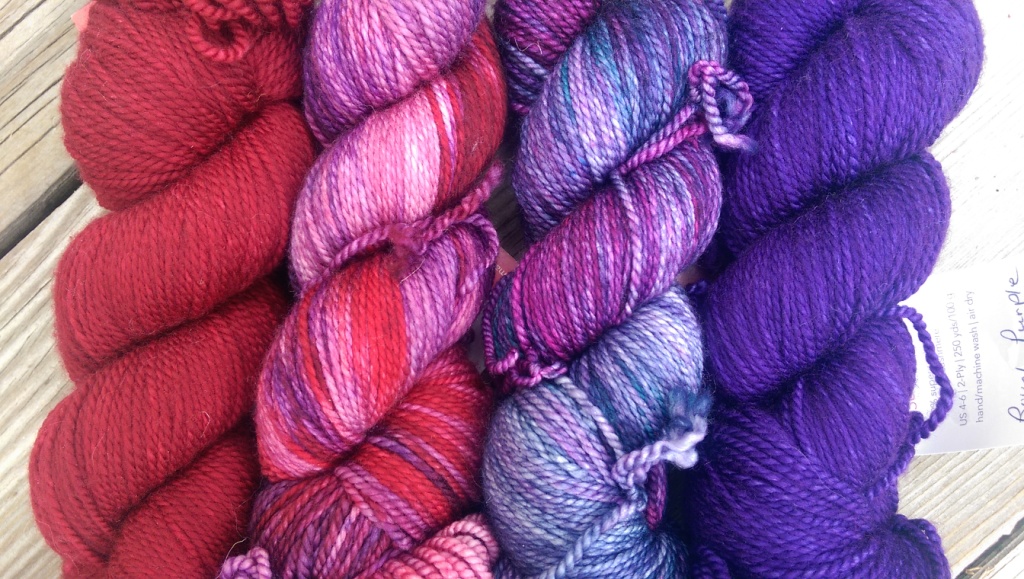
Here are my yarns. I will knit the body of the shawl using the two greys with the plum as the contrast color in the middle. The black will be used as a highlight color in the knitting and for the bindoff. All of these are Anzula Squishy and the cashmere in the yarn make them feel great. Here are the project notes at Ravelry.
Saturday night I visited one of my sons and cast on while watching him play Destiny after dinner. It was kind of fun watching him destroy alien creatures using a sword of fire (it’s a Destiny thing…) while I started on a shawl called Drachenfels. There were even some creatures in the game that were kind of dragon-like. It’s a sign!
Here’s how far I had gotten by Monday night. The yarn that I am using is a lighter weight than called for in the pattern so I am using smaller needles (size 4 instead of size 6). I’m thinking that I can extend the pattern if I need to enlarge the shawl.and here is the close-up of the scale stripe pattern. This is the darker of the two grey yarns. I’m saving the lighter one for later on in the shawl where there will be more plum. The yarn is extremely soft and, well, squishy. (See what I did there?) This shawl should be a joy to wear.
Did you see the cat hair in the middle of the picture? No matter how careful I am everything that I knit has CAT HAIR ON IT!!!
Yellow Boy: your point would be?
OK, I’m over the little cat-hair related rant. The shawl is starting out great and I’m really excited to finally be knitting it. The weather is still nice even though the leaves are changing so I plan on doing as much outdoor knitting as I can.
Last night I knitted like crazy and got my Reyna shawl (by Noora Laivola) finished. I wet blocked it overnight (hoping that sleeping kitties won’t notice it…) and this morning I took it outside to the garden swing to finish it up while I was watering the lawn. Of course my cat MacKenzie couldn’t resist helping out.
Oops! I didn’t realize he was hanging out under the swing… At least he’s predictable in that he never missed an opportunity to chomp!Here it is rescued from the cat. Isn’t it a fun mix of garter stitch and mesh? Here are my project notes on Ravelry.
This shawl was a fast and easy project, but I learned a lot of new things while working on it and it led to some new insights. After all, while I love to knit, I really am more driven to play with new yarns, patterns and ideas more than I need a new shawl (or pair of socks for that matter). Every new project is an opportunity to learn something new!
I first selected this pattern because I had a skein of wickedly soft and colorful yarn in my stash. I knew that the colors would go with everything in my wardrobe, but there were so many of them in the skein that I needed a way to show them off without nasty pooling or something that looked muddy.
This is Zen Yarn Garden’s Serenity 20 in the colorway Confetti. See what I mean about the colors? I knew that garter stitch plays well with multicolored yarn, and I was hoping that the mesh would break the colors up a little more and help each one shine. Mission accomplished! The yarn looks really different in the two sections of the shawl and the colors each stand out.
There are YO stitches to each side of the center stitch in the garter section. Hard to see aren’t they? That’s because they are hidden by knitting in the back loop of the YO on the wrong side row. Who knew? By hiding the YO stitches the garter stripe stands out better between the mesh segments.
I also noticed a difference in the mesh. Normally K2tog stitches slant to the right. In the mesh section of the shawl the K2tog creates a slant that goes to the left. Check it out!
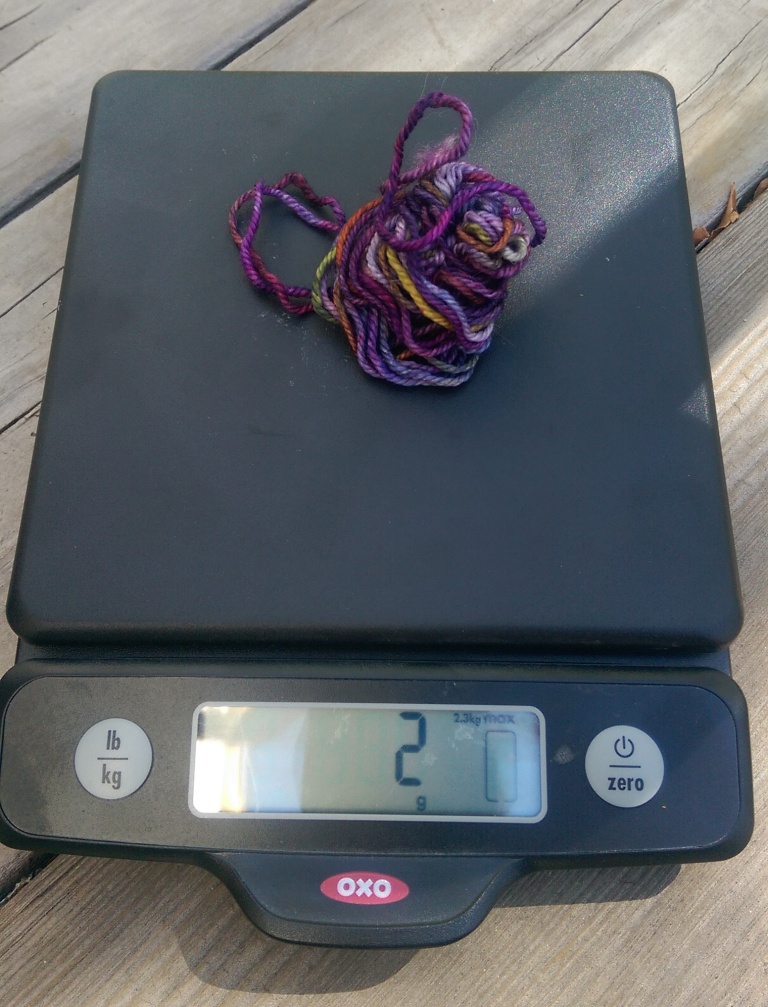
See the left slant? This was knit by [yo, K2tog] stitches that repeated every other row (all stitches purled on the wrong side).The right slanting mesh was created by the opposite type of decrease stitch: [yo, ssk] repeated across the row. Once again the stitches on the wrong side were purled. The designer balanced the direction of the mesh slant around the center stitch of the shawl. Cool! As I was knitting along I realized that my ball of yarn was starting the shrink a little faster than I wanted it to. Yikes! How can I be sure to use as much as possible while leaving enough for the last three garter rows and then the BO? Well, this is when a yarn warrior really digs in and takes control.
Look at what Noora gave us in the pattern! Wow, isn’t this a nice idea. In fact, it made me think that all patterns should be organized as a table with the rows, stitch count, the pattern, weight of the yarn and a place to make tally marks. I mean, why does the entire thing have to be written out? See how I started tracking how much my ball of yarn weighed every 4 rows? I decided to switch to the last 4 rows as soon as I had only 8 grams left. (8 rows of the mesh section were skipped)This is how many grams of yarn I had left over after binding off.
See, it isn’t about the final object (OK, it is a little). It’s about being a YARN WARRIOR!! Capture the learning and master the craft. Be at one with the cashmere and bond with your fellow knitters.
I love this time of the year. It is cool overnight and then heats right up during the day. The leaves of the trees are just starting to turn and there are birds flocking in their branches. Something is happening with the light: it is bright, but coming in at a lower angle that is the first hint of the southern winter sun to come. Mostly my garden is done blooming and this is when I decide which plants I want to save and bring inside for the winter.
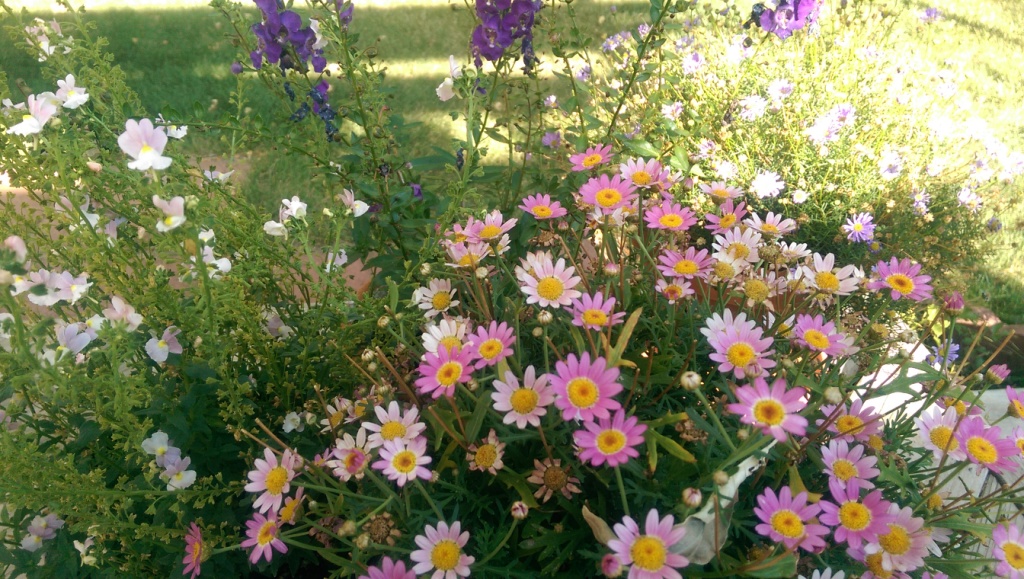
One thing is for sure. The indoor plants this year will be pink bloomers. I did plant some other colors. I was rocking the orange and yellow in June, but those guys have quit for the year. There was a lot of lavender and purple for awhile, but now there is mostly pink.
I have four pots of flowers blooming on my deck by the lounger. The one that is doing the best is that pink daisy. Hmm… I’ve never kept a plant like this inside over the winter. I wonder how it will do?This lantana is actually three years old. It hangs out with the orchids by a window under a grow light all winter. The leaves drop when it goes back outside in the spring, but it always recovers. It sure is blooming now, so it’s coming back inside for another winter. Look how cheerful it is! Perfect for the gloomy days to come.I also have four of these pink lantana plants in pots in my front yard. I’m torn about trying to save all of them. It doesn’t make sense to spend a ton of money for grow lights, but they sure are nice plants… I really miss the greenhouse that I used to have connected to my classroom in situations like this.This geranium is coming to live in my bedroom over the winter for sure. The plant is actually 5 years old and had grown leggy and over 3 feet tall while living inside. I took it back out this year, laid the long branches across the table and let nature take its course. The old leaves all bleached and died in the sun while the plant sprouted lots of new leaves down low on the stems; I cut all the long upper stems off and this is what was left. It started blooming late last month and really looks healthy now.Out of curiosity I dipped sections of the cut-back stems in rooting hormone to see if I could start some cuttings. It worked!! Gosh, I really need that greenhouse again. I guess I’ll check the price of grow lights that I can add to the shelves in the craft room. These plants will look great along the front walk next spring.Even the pink roses are outdoing themselves. My orange roses haven’t a bloom anywhere on them. These Home Run roses, however…
I also have a pot of tea roses that will move indoors. Guess what color they are? Everything that is coming inside is pink. Not exactly the color that I had planned for my winter-time flowers, but these are the ones that will be making the big move. It is just too hard to let the garden go over the winter; I always cling to as much as I can for those months of snow shoveling and gloomy afternoons.
Wait what am I talking about? Winter is the months of spinning yarn, knitting like crazy and baking yummy breads and indoor blooms. Instead of knitting outside in my garden I will be working among my garden plants inside.
Gosh, I really like this time of year. Maybe I can get a deal on the grow lights. 🙂
I am knitting and crafting like crazy. Actually I’m enjoying the balmy weather of summer’s end and I’m a little nuts because I just can’t seem to get everything done. The flowers on my deck are at their best. The crickets are chirping. The temperature outside is just about perfect and I am spending my time clicking knitting needles and feeling a little less than my normal cheerful self (more about that below). Still I am making progress and the setting is just about perfect. This afternoon I decided to set up the laptop on my backyard deck and let you all know what I’ve been up to. Here it is.
My sister’s birthday was the 5th of September. I bought her a card a couple of weeks ago and I sat down and got these bowls done in plenty of time to send to her. Here the are!
A set of fabric bowls. Bet she never saw this coming! She does sew a lot and I thought that she might find these useful in her crafting area or maybe on her desk. I found the pattern online at Quilter in Motion.I just love the fabric! This is a Laurel Burch pattern that I found last year.
I still haven’t mailed them off to my sister. They are now days overdue but I do have an excuse (OK, it’s pathetic, but still… It’s my excuse and I’m sticking to it!). My rheumatologist started me on a new medication for my systemic sclerosis (scleroderma) called CellCept, and it just doesn’t like me. Every part of my digestive system hurts!! Boo! Today I got up and decided that I am done with heartburn (not to mention middle of the night barfing) and e-mailed my doc to ask for something else from the land of pharmacological wonders. This morning I didn’t take my pill and this afternoon I plan to make the trip to the post office. Hang on sis! They really are coming…
Now the knitting makes sense, doesn’t it. No matter how upset my digestive system is I still manage to eat (yogurt is my friend) and knit. Lots of knitting has been going on. I dug in this last week and worked like crazy on the mitts that I am designing for Alta Vida Alpacas for Alpaca Farm Days which happens later on this month. They plan to sell kits of yarn with the pattern to visitors to the farm. I’ve been trying to make simple patterns that show off the yarn. Here’s what I’ve come up with:
This yarn is sportweight, 50% cotton (which gives it some slubs and texture), 25% wool and 25% alpaca (yum!). The yarn knits up great, feels light on your hands but is also soft, comfy and warm. I wanted them to look easy to knit (hello… trying to sell some kits here!!) but appealing. Please lay on the feedback people!
Like those colors? This is Colorado (AKA Broncos Country) and the football season starts this coming week. Yeah Broncos!! The thumb on the stripped mitt is a little different from the usual shape that I favor and I’m still thinking of knitting a stripped version with slower increases. The thumb on the solid mitts is more like what I like to knit and wear. It fits your hand with no pull across the hand and the ribbing on the top of the thumb is loose enough to allow you to wear the mitts over gloves. (Reynaud’s makes you think about things like that!) Be honest here: does that stripped thumb look goofy? Should I change it?
Beads! This is the same yarn in a version with some fun and glitz. The picot CO was new to me. Here’s the link to an online tutorial that does it the same way that I did. 🙂
So the knitting continues. I want to make the mate for the beaded mitt before the end of the week, and then will do a pair of stripped mitts with a more gradual thumb increase in blue and off-white. Next I have to write the patterns, but I’ve kept lots (and lots!) of notes while I knitted so I am feeling pretty positive about that next step.
Finally, I’m making some steady progress on the only knitting project that is just for me. Check out the Reyna shawl that is finally getting towards the end of it’s knitting journey.
I’m finally on the last section of mesh lace. I’m pretty nervous about the size of the ball of yarn; it’s clear that there isn’t enough to finish the shawl as the pattern is written. I’m weighing that ball fairly often so I can figure out when I need to stop knitting lace and switch over to the last garter rows and the BO. I’m giving myself about 7 grams to get the job done. Here’s a close-up of the pattern. I learned some new things as I knitted this shawl. The YO’s in the garter section are hidden by knitting in the back loops on the wrong side rows. Who knew that was a thing? I’m liking how it looks, however, Here are my project notes on Ravelry.
That’s the week. I’ve been reading a lot too, but I think that should wait for another post. And the flowers that I’ve got blooming on my deck are so fabulous they are crying for a post of their own…
It’s been a while since my last post. It has been really busy: more doctor appointments, a new drug (CellCept) to adjust to, and an infection that just refuses to die no matter how many antibiotics I swallow. I’m working hard at knitting up mitts and writing patterns for Alpaca Farm Days. The garden is suffering in the heat and cries to be watered. I’m way behind on my book reading. The cats are shedding in the heat and coating the house with hair. Then there was Yarn Along the Rockies…
What is Yarn Along the Rockies you ask?
Just the biggest event of the knitting calendar year in this part of the world! We are talking about a yarn tour with a tote bag, a passport, free goodies and patterns. A chance to meet new friends, crawl along with old ones, and visit unique yarn stores with unknown, hidden but possibly fabulous treasures. If ever there was a time to learn how to use the GPS function of your cell phone, this was it!
The event is held over 9 days and involves 23 yarn shops up and down the front range of Colorado. One shop is up in the mountains. There are people who manage to complete the tour in the first weekend by driving like maniacs and dashing in and out of stores without really looking at the goodies. Whatever. I am not one of those folk. I wanted to savor the tour, discover new yarns and patterns, make new friends, and locate some great stores. I split the tour into 4 different sections and drove a different section each day. Here’s how Yarn Along the Rockies works:
Every participant of the tour carries a passport with them. Each yarn store stamps the passport when you arrive in their shop. Most of the stores had a free pattern for a knitted project and several also gifted us with goodies like stamps, stitch markers, and coupons. At the end of the tour the passport is left with the last store to enter it into the drawing for the five grand prizes. (Baskets with hundreds of dollars of yarns and notions!!)Almost every person on the crawl had one of these canvas tote bags. Each shop gave us a button to put on the bag to record our progress. Cool! A lot of us bought things and stuffed them into the bags while we worked our way along the tour. Even more cool!!You also received stitch markers at each 6th shop. The green marker was for completing the tour. If all this wasn’t enough incentive to lure knitters onto the tour there were also drawings for gift baskets stuffed with yarn, patterns and goodies at each individual shop.
You can see how I got pulled into this. This isn’t a yarn crawl, it’s an adventure!! I tried to make a shopping plan for myself; I took patterns for future projects with me and decided on a shopping budget. Whatever. Sometimes it is best to just surrender to the experience. Here is what I ended up with.
I found this Serenity by Zen Yarn Garden at Mew Mew’s Yarn Shop. This is DK weight cashmere/merino yarn that is just begging to become winter fingerless mitts. Can’t you just feel the cashmere through the computer screen? This yarn feels wonderful!! I feel better about winter already. 🙂I could not walk out of Fancy Tiger Crafts without some of this Shelter by Brooklyn Tweed. I’m going to knit a winter sweater for myself that will be warm and wonderfully comfy. I decided on the Daelyn Pullover for my pattern.The cute pattern for Tea Time MItts was a free one at Needleworks by Holly Berry if you bought the silk/wool blend yarn. Of course I bought it!My last stop on the tour was Shuttles, Spindles and Skeins in Boulder, Colorado where I found a big display of MJ Yarns. The display was enough to stop me in my tracks. This stuff is Opulent Fingering yarn. Cashmere, check! Nylon, check! Happy feet this winter, check! This put me over my budget, but I’m talking about my (poor, blue colored, Raynaud’s suffering) feet here, people! Socks happen!!
So that was the tour. 9 days. 23 shops. 2 tanks of gas and a shopping budget blown to bits.
What more could any shopping knitter hope for? Oh yeah. The drawing for the grand prize is tomorrow. What will I do with all that yarn if I win?
Hey everyone. I’ll have a big giveaway!! Keep your fingers crossed for me. 🙂
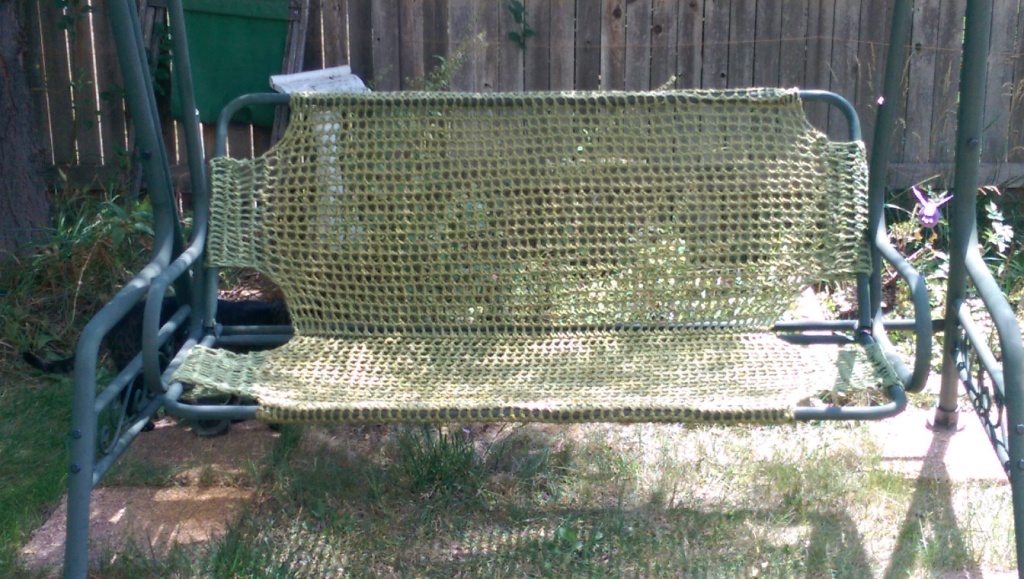
Cool weather with thunderstorms arrived this week and I headed out to the back yard to finish up the garden swing. I had crocheted the largest part of the seat a couple of weeks ago and gotten it sewn onto the frame of the swing; a good start but still not usable. What I needed to do now was to remove the seat from the rest of the chair so that I could crochet side panels to attach the seat onto the sides of the frame. I attacked the bolts with my handy little tool kit and got the part holding the seat off and onto the lawn where I could work on it in the shade.
As soon as I got that seat off the rest of the chair frame Mr. Helpful moved right in.The help just kept on coming as I crocheted side panels to attached the seat to the sides of the frame. I used my foot to put tension on the twine while I worked which put the working materials too close to MacKenzie the chomper.
Even with all the help and a break for a thunderstorm I got the side panels crocheted and sewn onto the frame after a couple of mornings. Today after lunch I reattached the seat to the swinging frame and then I was back in lawn chair business.
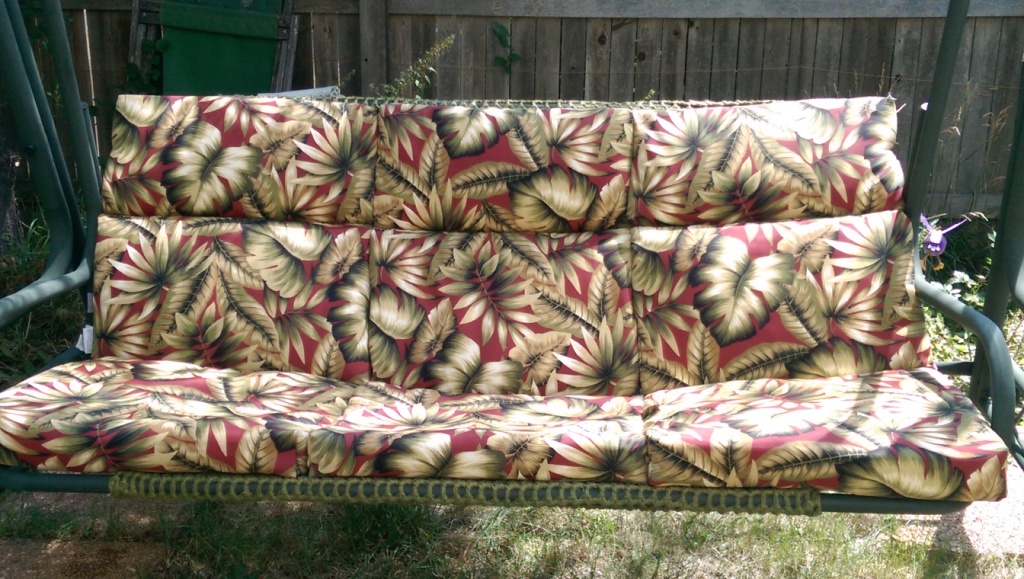
Here’s the completed seat with the sides attached to the frame. A little on the ugly side, but functional.Yeah! The swing is done and the cushions are back on it; I pulled the ties for each cushion through the crocheted mesh and then knotted them in the back. My outdoor knitting spot has been restored.
I’m still not completely happy with the tension on the seat of the swing so I’m going to use it for a couple of days and then will take in a tuck or two on the seat fabric to make it more taunt. Still, things are looking up; I am back outside for my morning latte. Happy, happy day!